Delete Background of a Photo in Photoshop
Photoshop offers a lot of techniques to remove an unwanted background from an image. However, using the standard Magic Wand tool to select and delete background may be adequate for a simple background.
For more complex backgrounds, you can use the background eraser tool. However, removing background from a complicated photograph can be tricky, especially if the object you want to isolate has lots of hair or if the background is highly complex. In this article, we will take you through removing a background from a photo using Photoshop to help you overcome that challenge.
How to Delete the Background of a Photo in Photoshop?
Despite many advances in Photoshop over the past few years, removing a background from an image has never been easier or faster. Knowing how to use the best method is the key to getting the best results with the best technology for the type of image you are working on.
Here are five ways to delete backgrounds from your photos using Photoshop services and use each technique to get the best results.
Photoshop Quick Action
When best to use: You’re doing it for yourself, you need it fast, and you’re not certainly looking for perfection. It is best to use high contrast between the subject and the background and when the issue has a reasonably straight line. Built-in Photoshop Quick Action is the fastest way to remove backgrounds in Photoshop. It is new to Photoshop 2021 (Creative Cloud Subscription) and provides a fast way to remove backgrounds. It comes with speed but comes with less accuracy. According to your image, Photoshop Quick Action will do most of the tasks for you, but the results may be lower than you expect. If you think so, you can use any methods described here to polish up your development.
Steps:
1.Open your image with Photoshop, right-click on your Background layer and click Duplicate Layer. Next, name your layer (whatever you’d like) in the dialog box that pops up, and click OK. Then, click on the eye icon to the left of the primary layer to turn that layer off.
2.Make sure that your Properties panel is open by going to Window > Properties. (If you already checked this, it is unnecessary to click on it; if it is not reviewed yet, click it to open it up on the right-hand side by default.)
3.Now in your Layers panel, click on the new layer. Then, click on the Remove Background button under Quick Action in the Properties panel (by default, this should show this above your Layers panel).
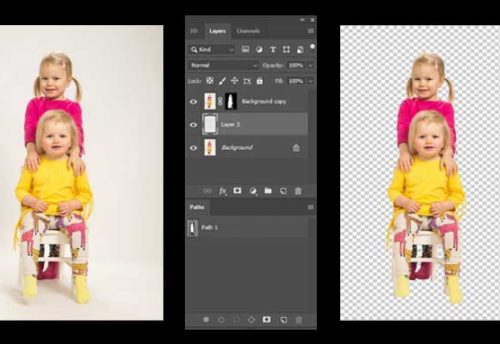
4.The quick action removes the background, leaving your layer with a mask around the subject.
From here, you can make any refining by going into the mask and adjusting if needed.
Background Eraser Tool
When best to use: it works with high contrast images; however, it takes enough time and effort to create a good result. The Background Eraser tool is better if you need a little more control over the delete background, but still, Photoshop wants to lift something heavy for you. For more power, you need to sacrifice some more time to get the desired result. Depending on your image, using the Background Eraser tool can be highly efficient and time-consuming and even close to your desired outcome over time.
Steps:
- Open your image with Photoshop, right-click on your Background layer and click Duplicate Layer. Next, name your layer (whatever you’d like) in the dialog box that pops up, and click OK. Then, click on the eye icon to the left of the primary layer to turn that layer off.
- Choose the Background Eraser tool from the toolbox on the left-hand side. The device may be hidden below the Eraser toolbox. Click the Eraser tool and hold on to reveal more options, and select the Background Eraser tool.
- Top the screen in the tool options bar, click the brush icon to highlight the brush panel.
- Change the hardness so that it’s near up to 100%.
- The size you think is appropriate for the image you are working with. In this case, we start it at 50px.
- You can fix this by using square brackets ( [ and ] ) to reduce and increase the size of the brush.
- At the top of the tool options bar, set the Sampling to be Continuous. It’s the first option of three icons to the brush size. Then, set a Limit to Find Edges and place the Tolerance somewhere in the 20–25% range.
- Note that the lower the Tolerance, the more minor color variations it will pick up. In contrast, the higher the Tolerance, the more colors the tool will select.
- 4.Start deleting the background around your subject using the Background Eraser tool by clicking and holding while removing the brush. The goal here is to prevent cross-hairs from touching your subject inside the device. Zoom into the image if you need to see more intimate details.
- I suggest you do a short stroke by the brush tool (remember the issue of releasing the mouse from time to time) since you can always undo it when the brush goes too long away.
- In the more complex areas, you will find that you need to change the size of your brush as you go. You may adjust the size of your brush up and down by revising the Tools Options bar at the top or using [ and ].
- If resizing the brush doesn’t work and deletes your subject, undo your action, go to the top to the tool options bar, adjust the pattern at Once (middle icon of a set of three), and limit the Discontiguous and Tolerance about 10%. It allows the brush to use the color under the cross-hair at that moment and not re-sample when you go with it.
The process may be quick or tedious depending on the image types but provides good results, as you’re in control of determining what the subject is and what isn’t. If this doesn’t work, the other methods described here can help you get closer to your desired results.
Pen Tool
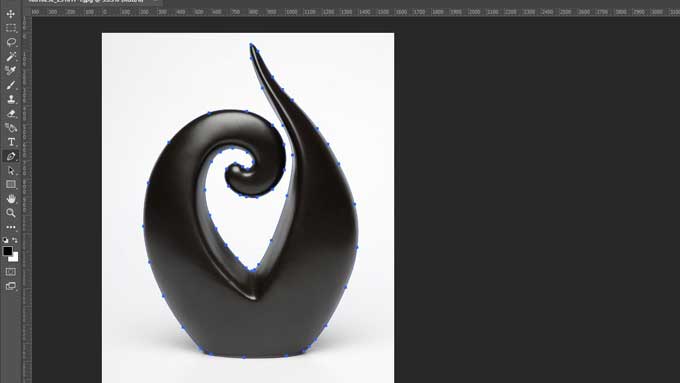
When to use: Subjects and backgrounds are not highly contradictory. Other tools such as the Photoshop Quick Action or Background Eraser Tool mentioned above are not producing the desired results. Pen Tool gives you the most control out of all the methods described here.
The pen tool is the most tried and true way to delete background from photos in Photoshop and gives you excellent control over the results. However, it’s more fruitful for better outcomes, but it is most time-consuming and requires high patience.
Steps:
1.Open your image with Photoshop, right-click on your Background layer and click Duplicate Layer. Next, name your layer (whatever you’d like) in the dialog box that pops up, and click OK. Then, click on the eye icon to the left of the primary layer to turn that layer off.
2.From the toolbox, select Pen Tool on the left-hand side (top of the Text tool). Zoom into any area of your image to start. Choose a starting point at the edge of your subject (or a suitable starting point) and click to begin the first anchor. Then start working on your subject by adding extra anchors to begin outlining your topic.
- If you want to draw a curved line, click-hold-drag to create a curved line, move the mouse to adjust the curve as needed.
- To modify an anchor point or direction lines for fine-tuning, apply the Direct Selection tool (under the path selection tool) in the toolbox.
- Go File > Undo or use your keyboard shortcut ( Control + Z ) to undo an anchor.
3.Make sure you completed the path after meeting up with your first point. If you completed the route and were satisfied with the result, you can save the path. First, go Window > Paths to reveal the Paths panel (it should appear on the right-hand side by default). Next, click the menu(three/four-bar) at the top right, click New Path, and name your path. Now your newly done path is saved in the Paths panel.
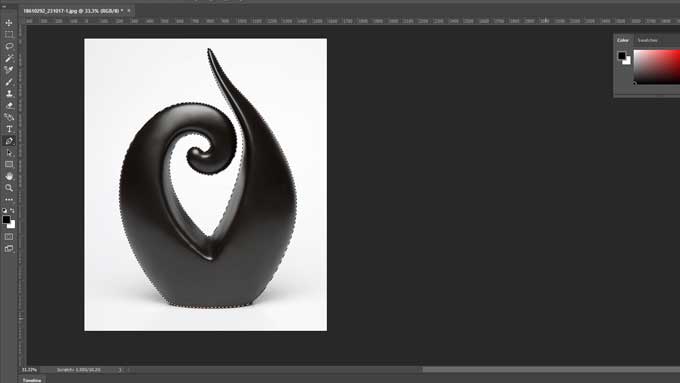
4.Next, right-click on your new path in the Path panel and select Make Selection. After that, click OK in the dialog box (leave all defaults for now). That will give you the marching ants outline where you marked your path.
5.Since we do not want to delete what is inside the Selection, we want to select everything except the subject. So, go to Select > Inverse. Now you see that the marching ants are around the whole figure and the subject, basically selecting the background.
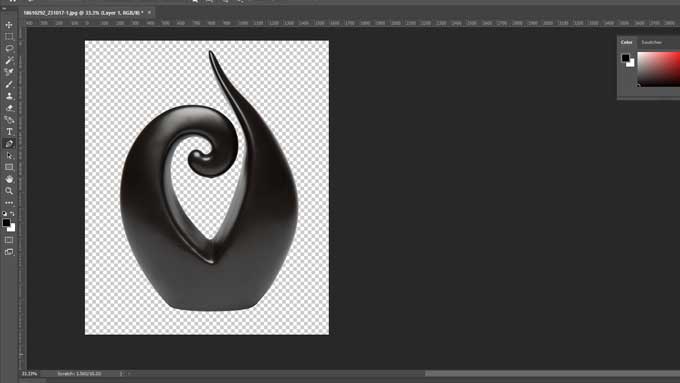
6.To delete the background, press Delete. You should now see a white/gray checkered background instead of your previous one.
You may find that, like the other methods listed, it does not get you 100%. However, by using a combination of Pen tools and other techniques here, you can get very close to your desired result.
Magnetic Lasso Tool
When best to use: High contrast from the background and complex edges, and when you want to save time, Photoshop will detect the path for you. If the pen tool is too laborious or you don’t want to take the time to cut out your object, then the Magnetic Lasso tool will be suitable for you. The device can be a good starting point for getting what you need quickly. So you can spend your time determining your desired context with details.
Steps:
1.Open your image with Photoshop, right-click on your Background layer and click Duplicate Layer. Next, name your layer (whatever you’d like) in the dialog box that pops up, and click OK. Then, click on the eye icon to the left of the primary layer to turn that layer off.
2.From the toolbox on the left, choose the Magic Lasso tool. Then, start drawing a path by the tool along the edge of your subject. If you start moving your cursor, you will see that it will start drawing the path for you. Again, patience is the most important here because you want to be slow, steady, and deliberate in your moves.
3.If you start the tool, you need to go to the entire area of your subject and connect to your starting point. If you come back around to the beginning once, then click the starting point. The selection path will turn into marching ants around your entire Selection.
4.Go to the Selection > Save Selection option and give it a name to save your task.
5.For delete the background, go to Select > Inverse to revert the marching ants (they now have to move around the edges of the image and your subject). Then press Delete. Now, you will see a white/gray checkered background instead of your initial background.
If you need any adjustments to the Selection, you can backtrack a few steps and redo them to get better outcomes. And if you feel you need to use a combination of other methods that describe this article to get you closer to your expected result, it’s up to your choice.
Quick Selection Tool
When best to use: The subject matter is somewhat contrasted and has a “wispy” or complex image description. You also want to save time and require appropriate precision and the ability to refine quickly. The Quick Selection Tool is probably the best of the methods described here, as it allows the faster way to select a subject and allows for quick refinements. It provides better results for any photo editing service for potential photos than the other methods listed here. It works by the most pleasing way of detecting color changes to determine where the Selection should be.
Steps:
1.Open your image with Photoshop, right-click on your Background layer and click Duplicate Layer. Next, name your layer (whatever you’d like) in the dialog box that pops up, and click OK. Then, click on the eye icon to the left of the primary layer to turn that layer off.
2.Choose the Quick Selection Tool on the left side (maybe the tool hidden under the Object Selection Tool).
3.With the tool, start painting your subject. You will notice that marching ants have started appearing while you are painting. For adjustment to the size of your tool, use the [ or ] keys to decrease or increase the size.
4.If you are drawing out of the subject, click and hold the Alt key, and you will see the center of the tool turn from a + symbol to a – sign; this will indicate a move away from the Selection. While holding the Option / Alt key, paint the part you want to remove.
5.Once you have selected everything you like, go to the Select > Save Selection option and name it to save your task. If you want to come back and make any adjustments, this is for it.
6.For delete the background, go to Select > Inverse to inverse the marching ants (they now have to move around the edges of the image and your subject). Then press Delete.
7.If you missed a spot or require any refinement, you can go back a few steps to refine and resave your Selection and try again.
Delete Background is Never an Easy Task
An essential part of the Photoshop post-production image editing service is the delete background, the primary and critical eCommerce image editing task. So, you have to find the best clipping path provider company such as Clipping Path Service Inc for your Bg removal service. The background removal services in Photoshop described in this article are not as easy as you think. However, whether you are looking for a quick and easy way to extract a subject from a picture, or you need a way to replace a more detailed image background, the above methods will help you get your results very quickly and with the best outcomes.
Lastly, depending on your final usage, if you want to save your image without a background, be sure to keep it as a transparent PNG. It allows you to use it in other applications as per your need and maintain your new background-free image.


Leave a Comment
You must be logged in to post a comment.